


Sketcher Tools
Pie Menu Interface
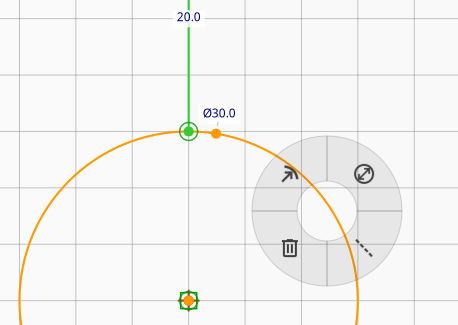
The sketcher features a context-aware pie menu that provides quick access to all drawing and constraint tools. This radial menu appears when you right-click in the sketch workspace and adapts based on your current context and selection.
The pie menu items dynamically show available options based on what you have selected. For example, when clicking on empty space, you'll see drawing tools. When clicking on selected geometry, you'll see applicable constraints.
Keyboard Shortcuts
The sketcher provides keyboard shortcuts for efficient workflow:
Tool Shortcuts
Space: Select toolG+P: Path tool (lines and bezier curves)G+A: Arc toolG+C: Ellipse toolG+R: Rectangle toolG+O: Rounded Rectangle toolG+F: Fill Area toolG+T: Text Box toolG+Y: Circular Array toolG+W: Array Along Curve toolG+G: Grid tool (toggle grid visibility)G+N: Toggle construction mode on selection
Action Shortcuts
C+H: Add Chamfer cornerC+F: Add Fillet cornerC+S: Straighten selected bezier curves to linesM+V: Mirror selection verticallyM+H: Mirror selection horizontallyCtrl+D: Duplicate selection in-place
Constraint Shortcuts
H: Apply Horizontal constraintV: Apply Vertical constraintN: Apply Perpendicular constraintT: Apply Tangent constraintE: Apply Equal constraintOorC: Apply Alignment constraint (Coincident)S: Apply Symmetry constraintK+D: Apply Distance constraintK+R: Apply Radius constraintK+O: Apply Diameter constraintK+A: Apply Angle constraintK+X: Apply Aspect Ratio constraint
General Shortcuts
Ctrl+Z: UndoCtrl+YorCtrl+Shift+Z: RedoCtrl+D: Duplicate selected elementsDelete: Delete selected elementsArrow keys: Nudge selected entities (holdShiftfor a larger step)Escape: Cancel current operation or deselectF: Fit view to content
Mirror, Duplicate, and Nudge
Several transformation tools work on the current selection:
- Mirror Vertically / Horizontally (
M+V/M+H): mirror the selection in-place across its bounding-box center. Constraints that span the selection boundary are dropped; internal constraints are preserved. - Duplicate (
Ctrl+D): copy the selection in-place. The copies get fresh IDs and remapped internal constraints; only the copies remain selected afterwards. Undo removes them. - Nudge: with entities selected, the arrow keys move the
selection. Hold
Shiftfor a larger nudge step.
These are available from the toolbar and the Sketch menu.
Construction Mode
Construction mode allows you to mark entities as "construction geometry" - helper elements used to guide your design but not part of the final output. Construction entities are displayed differently (typically as dashed lines) and are not included when the sketch is used for laser cutting or engraving.
To toggle construction mode:
- Select one or more entities
- Press
NorG+N, or use the Construction option in the pie menu
Construction entities are useful for:
- Creating reference lines and circles
- Defining temporary geometry for alignment
- Building complex shapes from a framework of guides
Grid, Snapping, and Visibility Controls
Grid Tool
The grid tool provides a visual reference for alignment and sizing:
- Toggle the grid on/off using the grid tool button or
G+G - The grid adapts to your zoom level for consistent spacing
Magnetic Snap
While creating or moving geometry, Rayforge automatically pulls your cursor toward nearby elements — endpoints, line midpoints, intersections, and other reference points. This makes it easy to connect shapes precisely without manually placing every point. The snap indicator highlights when your cursor is close to a snap target.
Auto-Constrain During Creation
Many drawing tools automatically apply constraints as you create geometry. For example, when drawing a line near the horizontal or vertical, the sketcher will offer to lock it in place. The path tool also creates horizontal and vertical constraints automatically when snap guides show alignment during drawing. This helps keep your sketch tidy from the start, rather than fixing things up afterward.
Show/Hide Controls
The sketcher toolbar includes toggle buttons to control visibility:
- Show/hide construction geometry: Toggle visibility of construction entities
- Show/hide constraints: Toggle visibility of constraint markers
These controls help reduce visual clutter when working on complex sketches.
Axis-Constrained Movement
When dragging points or geometry, hold Shift to constrain movement to the
nearest axis (horizontal or vertical). This is useful for maintaining alignment
while making adjustments.
Chamfer and Fillet
The sketcher provides tools to modify corners of your geometry:
- Chamfer: Replaces a sharp corner with a beveled edge. Select a junction point (where two lines meet) and apply the chamfer action.
- Fillet: Replaces a sharp corner with a rounded edge. Select a junction point (where two lines meet) and apply the fillet action.
To use chamfer or fillet:
- Select a junction point where two lines meet
- Press
C+Hfor chamfer orC+Ffor fillet - Use the pie menu or keyboard shortcuts to apply the modification