Importing Files
Rayforge supports importing various file formats, both vector and raster. This page explains how to import files and optimize them for best results.
Supported File Formats
Vector Formats
| Format | Extension | Import Method | Best For |
|---|---|---|---|
| SVG | .svg | Direct vectors or trace | Vector graphics, logos, designs |
| DXF | .dxf | Direct vectors | CAD drawings, technical designs |
.pdf | Direct vectors or trace | Documents with vector content | |
| LightBurn | .lbrn, .lbrn2 | Direct vectors | LightBurn project files |
| Ruida | .rd | Direct vectors | Ruida controller job files |
Raster Formats
| Format | Extension | Import Method | Best For |
|---|---|---|---|
| PNG | .png | Trace to vectors | Photos, images with transparency |
| JPEG | .jpg, .jpeg | Trace to vectors | Photos, continuous-tone images |
| BMP | .bmp | Trace to vectors | Simple graphics, screenshots |
All raster images are traced to create vector paths that can be used for laser operations. The quality depends on the tracing configuration.
Importing Files
The Import Dialog
Rayforge features a unified import dialog that provides live preview and configuration options for all supported file types. The dialog allows you to:
- Preview your import before adding it to the document
- Configure tracing settings for raster images
- Choose import method for SVG files (direct vectors or trace)
- Adjust parameters like threshold, invert, and auto-threshold
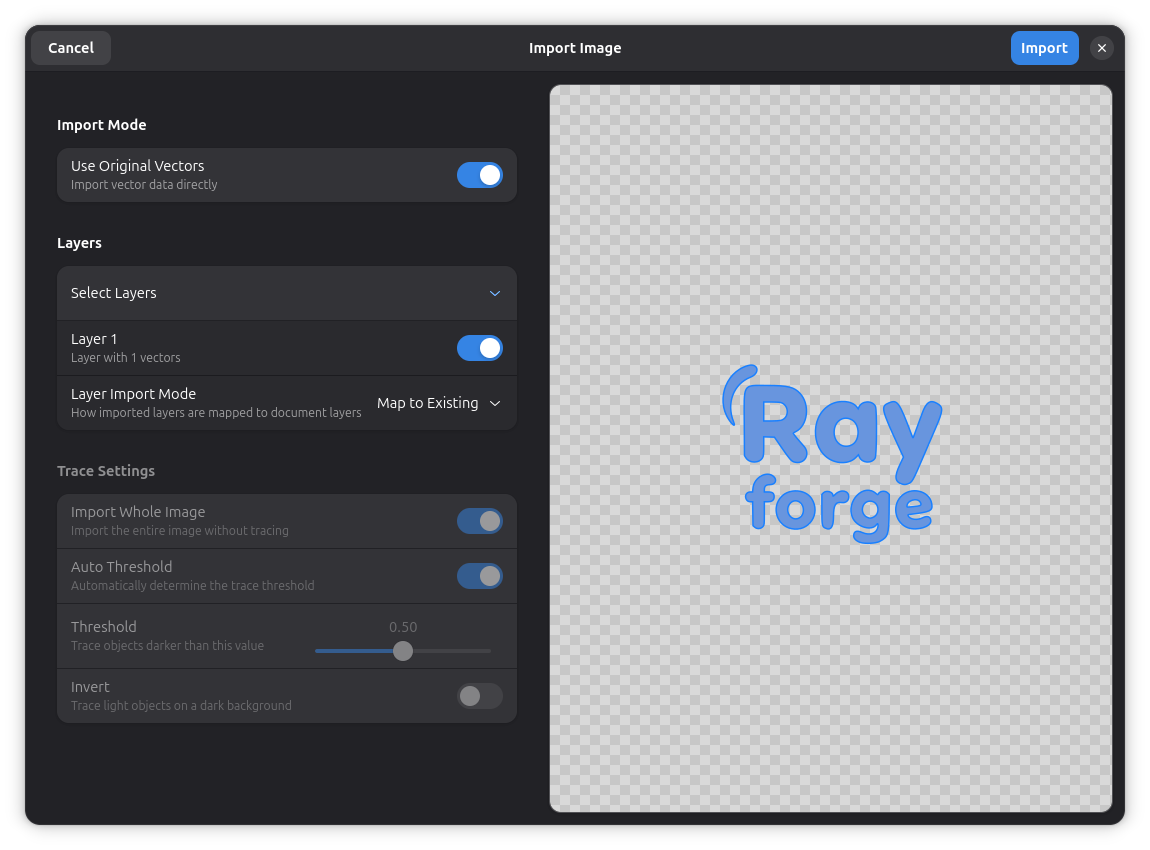
Layer Import Mode
When importing files that contain multiple layers (such as SVG or PDF files with named layers), the dialog offers three ways to handle them:
- Map to Existing: Match imported layers to existing document layers. The first layer from the source document is put into the first layer of your project, the second to the second and so on. This is the default and works well when your document already has layers set up.
- New Layers: Create a new layer in the document for each imported layer. This keeps imported content separate from existing work.
- Flatten: Merge all imported layers into a single layer. Useful when you want everything on one layer regardless of the original structure.
Method 1: File Menu
- File Import (or Ctrl+I)
- Select your file from the file picker
- Configure import settings in the import dialog
- Preview the result before importing
- Click Import to add to canvas and document tree
Method 2: Drag and Drop
- Drag file from your file manager
- Drop onto the Rayforge canvas
- Configure import settings in the import dialog
- Preview the result before importing
- Click Import to add to canvas and document tree
Method 3: Command Line
# Open Rayforge with a file
rayforge myfile.svg

# Multiple files
rayforge file1.svg file2.dxf
Auto-Resize on Import
When importing files that are larger than your machine's work area, Rayforge will automatically:
- Scale down the imported content to fit within the machine boundaries
- Preserve aspect ratio during scaling
- Center the scaled content in the workspace
- Show a notification with the option to undo the resize
The resize notification appears as a toast message:
- ⚠️ "Imported item was larger than the work area and has been scaled down to fit."
- Includes a "Reset" button to undo the auto-resize
- The toast remains visible until dismissed or the reset action is taken
This ensures your designs always fit within your machine's capabilities while giving you the flexibility to restore the original size if needed.
SVG Import
SVG (Scalable Vector Graphics) is the recommended format for vector designs.
Import Options in the Dialog
When importing SVG, the import dialog provides a toggle switch to choose between two methods:
1. Use Original Vectors (Recommended)
This option is enabled by default in the import dialog.
How it works:
- Parses SVG and converts paths directly to Rayforge geometry
- High-fidelity preservation of curves and shapes
- Maintains exact vector data
Pros:
- Best quality and precision
- Editable paths
- Small file size
Cons:
- Some advanced SVG features not supported
- Complex SVGs may have issues
Use for:
- Clean vector designs from Inkscape, Illustrator
- Simple to moderate complexity
- Designs without advanced SVG features
2. Trace Bitmap
Disable "Use Original Vectors" to use this method.
How it works:
- Renders SVG to a raster image first
- Traces the rendered image to create vectors
- More compatible but less precise
Pros:
- Handles complex SVG features
- Robust fallback method
- Supports effects and filters
Cons:
- Quality loss from rasterization
- Larger file sizes
- Not as precise
Use for:
- SVGs that fail direct import
- SVGs with effects, filters, gradients
- When direct import produces errors
Live Preview
The import dialog shows a live preview of how your SVG will be imported:
- Vector paths are displayed in blue overlay
- For trace mode, the original image is shown with the traced paths
- Preview updates in real-time as you change settings
SVG Best Practices
Prepare your SVG for best results:
-
Convert text to paths:
- Inkscape:
Path → Object to Path - Illustrator:
Type → Create Outlines
- Inkscape:
-
Simplify complex paths:
- Inkscape:
Path → Simplify(Ctrl+L) - Remove unnecessary nodes
- Inkscape:
-
Ungroup nested groups:
- Flatten hierarchy where possible
Object → Ungroup(Ctrl+Shift+G)
-
Remove hidden elements:
- Delete guides, grids, construction lines
- Remove invisible/transparent objects
-
Save as Plain SVG:
- Inkscape: "Plain SVG" or "Optimized SVG"
- Not "Inkscape SVG" (has extra metadata)
-
Check document units:
- Set to mm or inches as appropriate
- Rayforge uses mm internally
Common SVG features that may not import:
- Gradients (convert to solid fills or raster)
- Filters and effects (flatten to paths)
- Masks and clipping paths (expand/flatten)
- Embedded raster images (export separately)
- Text (convert to paths first)
DXF Import
DXF (Drawing Exchange Format) is common for CAD software.
DXF Versions
Rayforge supports standard DXF formats:
- R12/LT2 (recommended) - Best compatibility
- R13, R14 - Good support
- R2000+ - Generally works, but R12 is safer
Tip: Export as R12/LT2 DXF for maximum compatibility.
DXF Import Tips
Before exporting from CAD:
-
Simplify the drawing:
- Remove unnecessary layers
- Delete dimensions and annotations
- Remove 3D objects (use 2D projection)
-
Check units:
- Verify drawing units (mm vs inches)
- Rayforge assumes mm by default
-
Flatten layers:
- Consider exporting only relevant layers
- Hide or delete construction layers
-
Use appropriate precision:
- Laser precision is typically 0.1mm
- Don't over-specify precision
After import:
- Check scale (DXF units may need adjustment)
- Verify all paths imported correctly
- Delete any unwanted construction elements
PDF Import
PDF files can contain vector graphics, raster images, or both.
Direct Vector Import
When importing a PDF that contains vector paths, Rayforge can import them directly — just like SVG or DXF files. This gives you clean, scalable geometry without any quality loss from rasterization.
If the PDF contains layers, Rayforge detects them and lets you pick which ones to import. Each layer becomes a separate workpiece in your document. This works the same way as SVG layer import: enable or disable individual layers in the import dialog before importing.
This is especially useful for PDFs exported from design software like Illustrator or Inkscape where the vector paths are clean and well-organized.
Fallback: Render and Trace
For PDFs that do not contain usable vector data — scanned documents, embedded photos, or PDFs where text has not been converted to outlines — Rayforge can fall back to rendering the PDF to an image and tracing it. This works the same way as raster image import.
PDF Import Tips
Best results:
-
Use vector PDFs: PDFs created from vector software (Illustrator, Inkscape) give the cleanest results with direct import.
-
Check for layers: If your PDF has layers, you will see them listed in the import dialog. Select only the layers you need.
-
For documents with text: Export as SVG with fonts converted to paths for the best quality, or use the render-and-trace fallback.
-
Use the import dialog preview: Adjust threshold and invert settings when using trace mode. The preview shows exactly how the PDF will be traced.
Ruida Import
Ruida (.rd) files are proprietary binary job files used by Ruida controllers in many laser cutting machines. These files contain both vector geometry and laser settings organized in layers (colors).
After import:
- Check scale - Verify dimensions match expected size
- Review layers - Ensure all layers imported correctly
- Validate paths - Confirm all cutting paths are present
Limitations
- Read-only import - Ruida files can only be imported, not exported
- Binary format - Direct editing of original .rd files not supported
- Proprietary features - Some advanced Ruida features may not be fully supported
LightBurn Import
LightBurn (.lbrn / .lbrn2) files are proprietary project files used by LightBurn laser cutter software. They store vector geometry organized in color-coded layers with configurable laser settings.
After import:
- Review layers — LightBurn layers are mapped to document layers with matching names
- Check laser settings — Power, speed, and pass settings from LightBurn layers are preserved
- Validate paths — Confirm all cutting paths are present and correctly positioned
Limitations
- Read-only import — LightBurn files can only be imported, not exported
- Binary format — Direct editing of original .lbrn files is not supported
- Proprietary features — Some advanced LightBurn-specific features may not be fully supported
Raster Image Import (PNG, JPG, BMP)
Raster images are traced to create vector paths using the import dialog.
Tracing Process in the Dialog
How it works:
- Image loaded into the import dialog
- Live preview shows the traced result
- Tracing settings can be adjusted in real-time
- Vector paths created from the traced edges
- Paths added to the document as workpieces when imported
Tracing Configuration in the Dialog
The import dialog provides these adjustable parameters:
| Parameter | Description | Effect |
|---|---|---|
| Auto Threshold | Automatic detection | When enabled, automatically finds optimal threshold |
| Threshold | Black/white cutoff | Lower = more detail, higher = simpler |
| Invert | Reverse colors | Trace light objects on dark background |
Default settings work well for most images. The dialog shows a live preview that updates as you adjust these settings, allowing you to fine-tune the trace before importing.
Preparing Images for Tracing
For best results:
-
High contrast:
- Adjust brightness/contrast in image editor
- Clear distinction between foreground and background
-
Clean background:
- Remove noise and artifacts
- Solid white or transparent background
-
Appropriate resolution:
- 300-500 DPI for photos
- Too high = slow tracing, too low = poor quality
-
Crop to content:
- Remove unnecessary borders
- Focus on the area to be engraved/cut
-
Convert to black and white:
- For cutting: pure B&W
- For engraving: grayscale is fine
Image editing tools:
- GIMP (free)
- Photoshop
- Krita (free)
- Paint.NET (free, Windows)
Trace Quality
Good trace candidates:
- Logos with clear edges
- High-contrast images
- Line art and drawings
- Text (though better as vector)
Poor trace candidates:
- Low-resolution images
- Photos with soft edges
- Images with gradients
- Very detailed or complex photos
Related Pages
- Supported Formats - Detailed format specifications
- Exporting G-code - Output options
- Quick Start - First import tutorial