Macros & Hooks
Rayforge provides two powerful automation features for customizing your workflow: Macros and Hooks. Both allow you to inject custom G-code into your jobs, but they serve different purposes.
Overview
| Feature | Purpose | Trigger | Use Case |
|---|---|---|---|
| Macros | Reusable G-code snippets | Manual execution | Quick commands, test patterns, custom routines |
| Hooks | Automatic G-code injection | Job lifecycle events | Startup sequences, layer changes, cleanup |
Macros
Macros are named, reusable G-code scripts that you can execute manually at any time.
What Are Macros For?
Common macro use cases:
- Homing the machine - Send
$Hquickly - Setting work offsets - Store and recall G54/G55 positions
- Air assist control - Toggle air assist on/off
- Focus testing - Run a quick focus test pattern
- Custom tool changes - For multi-laser setups
- Emergency routines - Quick shutdown or alarm clear
- Material probing - Auto-focus or height measurement
Creating a Macro
-
Open Machine Settings:
- Navigate to Settings → Machine → Macros
-
Add a new macro:
- Click the "+" button
- Enter a descriptive name (e.g., "Home Machine", "Enable Air Assist")
-
Write your G-code:
- Each line is a separate G-code command
- Comments start with
;or( - Variables can be used (see Variable Substitution below)
-
Save the macro
-
Execute the macro:
- From the macros list, click the macro
- Or assign a keyboard shortcut (if supported)
Example Macros
Simple: Home the Machine
Name: Home Machine Code:
$H
; Waits for homing to complete
Use: Quickly home the machine before starting work.
Medium: Set Work Offset
Name: Set G54 to Current Position Code:
G10 L20 P1 X0 Y0
; Sets G54 work coordinate system origin to current position
Use: Mark the current laser position as the job origin.
Advanced: Focus Test Grid
Name: 9-Point Focus Test Code:
; 9-point grid for finding optimal focus
G21  ; Millimeters
G90  ; Absolute positioning
G0 X10 Y10
M3 S1000
G4 P0.1
M5
G0 X20 Y10
M3 S1000
G4 P0.1
M5
; ... (repeat for remaining points)
Use: Quickly test focus at different positions on the bed.
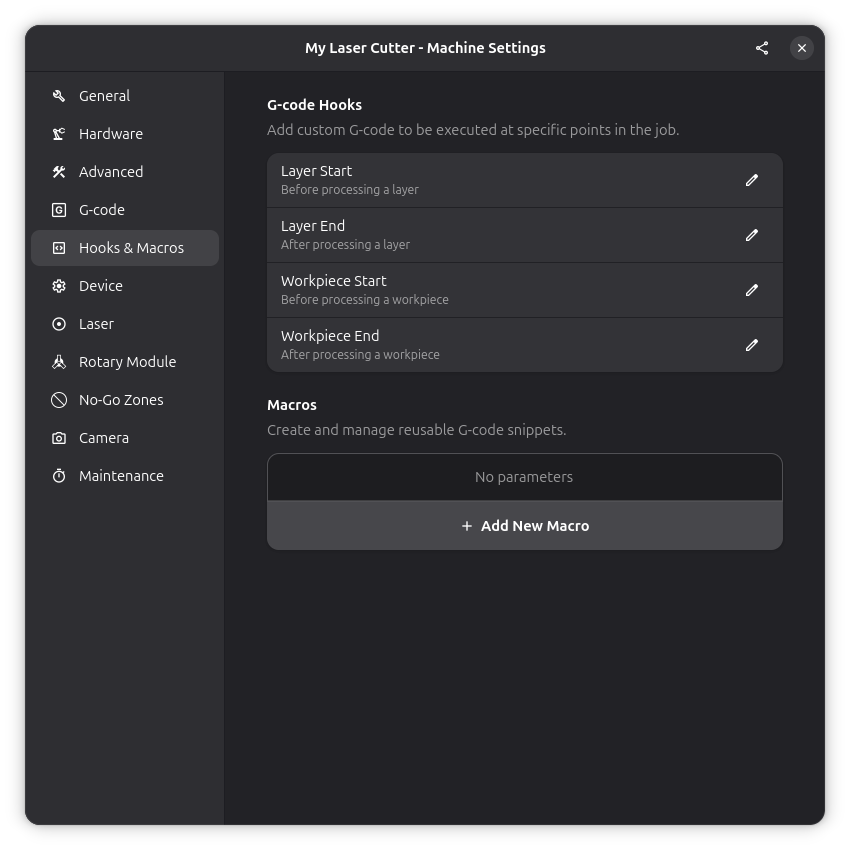
Hooks
Hooks are automatic G-code injections triggered by specific events during job execution.
Hook Triggers
Rayforge supports these hook triggers:
| Trigger | When It Runs | Common Uses |
|---|---|---|
| Layer Start | Before processing each layer | Tool change, power adjust, comments |
| Layer End | After processing each layer | Progress notification, pause |
| Workpiece Start | Before processing each workpiece | Part numbering, alignment marks |
| Workpiece End | After processing each workpiece | Cooldown, inspection pause |
Job start and end G-code is configured through the dialect's preamble and postscript settings, not hooks. See G-code Settings for details.
Creating a Hook
-
Open Machine Settings:
- Navigate to Settings → Machine → Hooks
-
Select a trigger:
- Choose the event when this hook should run
-
Write your G-code:
- Hook code is injected at the trigger point
- Use variables for dynamic values (see below)
-
Enable/disable:
- Toggle hooks on/off without deleting them
Example Hooks
Layer Start: Add Comment
Trigger: Layer Start Code:
; Starting layer: {layer_name}
; Layer index: {layer_index}
Purpose: Makes G-code more readable for debugging.
Workpiece Start: Part Numbering
Trigger: Workpiece Start Code:
; Part: {workpiece_name}
; Part {workpiece_index} of {total_workpieces}
Purpose: Track progress in multi-part jobs.
Hook Execution Order
For a job with 2 layers, each with 2 workpieces:
  [Layer Start Hook] (Layer 1)
    [Workpiece Start Hook] (Workpiece 1)
      ... workpiece 1 G-code ...
    [Workpiece End Hook] (Workpiece 1)
    [Workpiece Start Hook] (Workpiece 2)
      ... workpiece 2 G-code ...
    [Workpiece End Hook] (Workpiece 2)
  [Layer End Hook] (Layer 1)
  [Layer Start Hook] (Layer 2)
    [Workpiece Start Hook] (Workpiece 3)
      ... workpiece 3 G-code ...
    [Workpiece End Hook] (Workpiece 3)
    [Workpiece Start Hook] (Workpiece 4)
      ... workpiece 4 G-code ...
    [Workpiece End Hook] (Workpiece 4)
  [Layer End Hook] (Layer 2)
Variable Substitution
Both macros and hooks support variable substitution to inject dynamic values.
Available Variables
Variables use {variable_name} syntax and are replaced during G-code generation.
Job-level variables:
| Variable | Description | Example Value |
|---|---|---|
{job_name} | Name of the current job/document | "test-job" |
{date} | Current date | "2025-10-03" |
{time} | Current time | "14:30:25" |
Layer-level variables:
| Variable | Description | Example Value |
|---|---|---|
{layer_name} | Name of the current layer | "Cut Layer" |
{layer_index} | Zero-based index of current layer | 0, 1, 2... |
{total_layers} | Total number of layers in job | 3 |
Workpiece-level variables:
| Variable | Description | Example Value |
|---|---|---|
{workpiece_name} | Name of the workpiece | "Circle 1" |
{workpiece_index} | Zero-based index of current workpiece | 0, 1, 2... |
{total_workpieces} | Total number of workpieces | 5 |
Machine variables:
| Variable | Description | Example Value |
|---|---|---|
{machine_name} | Name of the machine profile | "My K40" |
{max_speed} | Maximum cutting speed (mm/min) | 1000 |
{work_width} | Work area width (mm) | 300 |
{work_height} | Work area height (mm) | 200 |
Example: Progress Notification
Hook: Layer Start Code:
; ========================================
; Layer {layer_index} of {total_layers}: {layer_name}
; Job: {job_name}
; Time: {time}
; ========================================
Result in G-code:
; ========================================
; Layer 0 of 3: Cut Layer
; Job: test-project
; Time: 14:30:25
; ========================================
Advanced Use Cases
Multi-Tool Setup
For machines with multiple lasers or tools:
Hook: Workpiece Start Code:
; Select tool for workpiece {workpiece_name}
T{tool_number}  ; Tool change command (if supported)
G4 P1           ; Wait for tool change
Conditional Pauses
Add optional pauses for inspection:
Hook: Layer End Code:
; M0 ; Uncomment to pause after each layer for inspection
Air Assist Per Layer
Control air assist on a per-layer basis:
Hook: Layer Start (for cutting layers) Code:
M8 ; Air assist ON
Hook: Layer Start (for engraving layers) Code:
M9 ; Air assist OFF (prevents dust scattering for engraving)
Rayforge doesn't currently support per-layer hook customization. To achieve this, use conditional G-code or separate machine profiles.
Safety Considerations
Always test macros and hooks in simulation mode or with the laser disabled before running on real jobs. Incorrectly configured G-code can:
- Crash the machine into limits
- Fire the laser unexpectedly
- Damage materials or equipment
Safety checklist:
- Macros include feedrate limits (
Fparameter) - Macros check position bounds
- Tested in simulation or with laser disabled
Related Pages
- Device Settings - GRBL command reference
- G-code Dialects - G-code compatibility
- General Settings - Machine configuration
- Multi-Layer Workflow - Using hooks with layers