Device Settings
The Device page in Machine Settings allows you to read and apply settings directly to your connected device (controller). These are also known as "dollar settings" or $$ settings in GRBL.
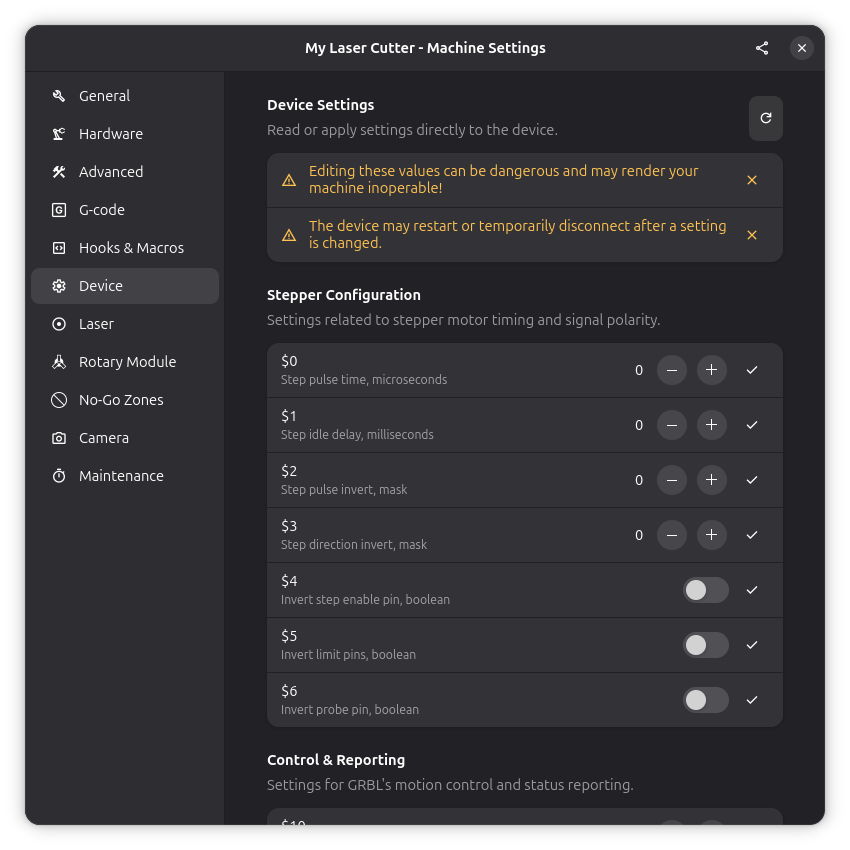
Incorrect firmware settings can cause your machine to behave unpredictably, lose position, or even damage hardware. Always record original values before making changes, and modify one setting at a time.
Overview
The Device page provides direct access to your controller's firmware settings. This is where you can:
- Read current settings from the device
- Modify individual settings
- Apply changes to the device
Firmware settings control:
- Motion parameters: Speed limits, acceleration, calibration
- Limit switches: Homing behavior, soft/hard limits
- Laser control: Power range, laser mode enable
- Electrical configuration: Pin inversions, pullups
- Reporting: Status message format and frequency
These settings are stored on your controller (not in Rayforge) and persist across power cycles.
Reading Settings
Click the Read from Device button to fetch the current settings from your connected controller. This requires:
- The machine to be connected
- The driver to support reading device settings
Applying Settings
After modifying settings, changes are applied to the device. The device may:
- Restart temporarily
- Disconnect and reconnect
- Require a power cycle for some changes
Console Access
You can also view/modify settings via G-code console:
View all settings:
$$
View single setting:
$100
Modify setting:
$100=80.0
Restore defaults:
$RST=$
The $RST=$ command resets all GRBL settings to factory defaults. You'll lose any calibration and tuning. Back up your settings first!
Critical Settings for Lasers
These settings are most important for laser operation:
$32 - Laser Mode
Value: 0 = Disabled, 1 = Enabled
Purpose: Enables laser-specific features in GRBL
When enabled (1):
- Laser automatically turns off during G0 (rapid) moves
- Power dynamically adjusts during acceleration/deceleration
- Prevents accidental burns during positioning
When disabled (0):
- Laser behaves like a spindle (CNC mode)
- Doesn't turn off during rapids
- Dangerous for laser use!
$32 should always be set to 1 for laser cutters. Disabled laser mode can cause unintended burns and fire hazards.
$30 & $31 - Laser Power Range
$30 - Maximum Laser Power (RPM) $31 - Minimum Laser Power (RPM)
Purpose: Defines the power range for S commands
Typical values:
- $30=1000, $31=0 (S0-S1000 range, most common)
- $30=255, $31=0 (S0-S255 range, some controllers)
The "Max Power" setting in your Laser Settings should match your $30 value. If $30=1000, set max power to 1000 in Rayforge.
$130 & $131 - Maximum Travel
$130 - X Maximum Travel (mm) $131 - Y Maximum Travel (mm)
Purpose: Defines your machine's working area
Why it matters:
- Soft limits ($20) use these values to prevent crashes
- Defines the coordinate system bounds
- Must match your physical machine size
Settings Reference
Stepper Configuration ($0-$6)
Controls stepper motor electrical signals and timing.
| Setting | Description | Typical Value |
|---|---|---|
| $0 | Step pulse time (μs) | 10 |
| $1 | Step idle delay (ms) | 25 |
| $2 | Step pulse invert (mask) | 0 |
| $3 | Step direction invert (mask) | 0 |
| $4 | Invert step enable pin | 0 |
| $5 | Invert limit pins | 0 |
| $6 | Invert probe pin | 0 |
Limits & Homing ($20-$27)
Controls limit switches and homing behavior.
| Setting | Description | Typical Value |
|---|---|---|
| $20 | Soft limits enable | 0 or 1 |
| $21 | Hard limits enable | 0 |
| $22 | Homing cycle enable | 0 or 1 |
| $23 | Homing direction invert | 0 |
| $24 | Homing locate feed rate (mm/min) | 25 |
| $25 | Homing search seek rate (mm/min) | 500 |
| $26 | Homing debounce delay (ms) | 250 |
| $27 | Homing pull-off distance (mm) | 1.0 |
Spindle & Laser ($30-$32)
| Setting | Description | Laser Value |
|---|---|---|
| $30 | Maximum spindle speed | 1000.0 |
| $31 | Minimum spindle speed | 0.0 |
| $32 | Laser mode enable | 1 |
Axis Calibration ($100-$102)
Defines how many stepper motor steps equal one millimeter of movement.
| Setting | Description | Notes |
|---|---|---|
| $100 | X steps/mm | Depends on pulley/belt ratio |
| $101 | Y steps/mm | Usually same as X |
| $102 | Z steps/mm | Not used on most lasers |
Calculating steps/mm:
steps/mm = (motor_steps_per_rev × microstepping) / (pulley_teeth × belt_pitch)
Example: 200 steps/rev, 16 microstepping, 20 teeth pulley, GT2 belt:
steps/mm = (200 × 16) / (20 × 2) = 3200 / 40 = 80
Axis Speed & Acceleration ($110-$122)
| Setting | Description | Typical Value |
|---|---|---|
| $110 | X max rate (mm/min) | 5000.0 |
| $111 | Y max rate (mm/min) | 5000.0 |
| $112 | Z max rate (mm/min) | 500.0 |
| $120 | X acceleration (mm/sec²) | 500.0 |
| $121 | Y acceleration (mm/sec²) | 500.0 |
| $122 | Z acceleration (mm/sec²) | 100.0 |
Axis Travel ($130-$132)
| Setting | Description | Notes |
|---|---|---|
| $130 | X max travel (mm) | Working area width |
| $131 | Y max travel (mm) | Working area depth |
| $132 | Z max travel (mm) | Z travel (if applicable) |
Common Configuration Example
Typical Diode Laser (300×400mm)
$0=10          ; Step pulse 10μs
$1=255         ; Step idle delay 255ms
$2=0           ; No step invert
$3=0           ; No direction invert
$4=0           ; No enable invert
$5=0           ; No limit invert
$10=1          ; Report WPos
$11=0.010      ; Junction deviation 0.01mm
$12=0.002      ; Arc tolerance 0.002mm
$13=0          ; Report mm
$20=1          ; Soft limits enabled
$21=0          ; Hard limits disabled
$22=1          ; Homing enabled
$23=0          ; Home to min
$24=50.0       ; Homing feed 50mm/min
$25=1000.0     ; Homing seek 1000mm/min
$26=250        ; Homing debounce 250ms
$27=2.0        ; Homing pull-off 2mm
$30=1000.0     ; Max power S1000
$31=0.0        ; Min power S0
$32=1          ; Laser mode ON
$100=80.0      ; X steps/mm
$101=80.0      ; Y steps/mm
$102=80.0      ; Z steps/mm
$110=5000.0    ; X max rate
$111=5000.0    ; Y max rate
$112=500.0     ; Z max rate
$120=500.0     ; X accel
$121=500.0     ; Y accel
$122=100.0     ; Z accel
$130=400.0     ; X max travel
$131=300.0     ; Y max travel
$132=0.0       ; Z max travel
Backing Up Settings
Backup Procedure
-
Via Rayforge:
- Open Device Settings panel
- Click "Export Settings"
- Save file as
grbl-backup-YYYY-MM-DD.txt
-
Via console:
- Send
$$command - Copy all output to text file
- Save with date
- Send
Restore Procedure
- Open backup file
- Send each line (
$100=80.0, etc.) via console - Verify with
$$command
Back up your settings after any calibration or tuning. Store backups in a safe location.
See Also
- General Settings - Machine name and speed settings
- Laser Settings - Laser head configuration
- Connection Troubleshooting - Fixing connection problems