Engrave
Engrave operations fill areas with raster scanning lines, supporting multiple modes for different engraving effects. From smooth grayscale photos to 3D relief effects, choose the mode that best suits your design and material.
Overview
Engrave operations:
- Fill closed shapes with scanning lines
- Support multiple engraving modes for different effects
- Work with both vector shapes and bitmap images
- Use bidirectional scanning for speed
- Create permanent marks on many materials
Engrave Modes
Variable Power Mode
Variable Power mode varies laser power continuously based on image brightness, creating smooth grayscale engraving with gradual transitions.
Best For:
- Smooth grayscale photos and images
- Natural gradients and transitions
- Portraits and artwork
- Wood and leather engraving
Key Features:
- Continuous power modulation
- Min/max power control
- Smooth gradients
- Better tonal quality than dithering
Constant Power Mode
Constant Power mode engraves at full power, with a threshold determining which pixels are engraved. This creates clean black/white results.
Best For:
- Text and logos
- High-contrast graphics
- Clean black/white engravings
- Simple shapes and patterns
Key Features:
- Threshold-based engraving
- Consistent power output
- Faster than variable power mode
- Clean edges
Dither Mode
Dither mode converts grayscale images to binary patterns using dithering algorithms, enabling high-quality photo engraving with better tonal reproduction than simple threshold-based methods.
Best For:
- Engraving photographs on wood or leather
- Creating halftone-style artwork
- Images with smooth gradients
- When standard raster doesn't capture enough detail
Key Features:
- Multiple dithering algorithm choices
- Better detail preservation
- Perceived continuous tones
- Ideal for photographs
Multiple Depths Mode
Multiple Depths mode creates 3D relief effects by varying laser power based on image brightness, with multiple passes for deeper carving.
Best For:
- Creating 3D portraits and artwork
- Terrain and topographic maps
- Lithophanes (light-transmitting 3D images)
- Embossed logos and designs
- Relief sculptures
Key Features:
- Depth mapping from image brightness
- Configurable min/max depth
- Smooth gradients
- Multiple passes for deeper engraving
- Z-stepping between passes
When to Use Engrave
Use engrave operations for:
- Engraving text and logos
- Creating images and photos on wood/leather
- Filling solid areas with texture
- Marking parts and products
- Creating 3D relief effects
- Halftone-style artwork
Don't use engrave for:
- Cutting through material (use Contour instead)
- Precise outlines (raster creates filled areas)
- Fine line work (vectors are cleaner)
Creating an Engrave Operation
Step 1: Prepare Content
Engrave works with:
- Vector shapes - Filled with scanning lines
- Text - Converted to filled paths
- Images - Converted to grayscale and engraved
Step 2: Add Engrave Operation
- Menu: Operations → Add Engrave
- Shortcut: ctrl+shift+e
- Right-click: Context menu → Add Operation → Engrave
Step 3: Choose Mode
Select the engraving mode that best suits your needs:
- Variable Power - Smooth grayscale engraving
- Constant Power - Clean black/white engraving
- Dither - High-quality photo engraving
- Multiple Depths - 3D relief effects
Step 4: Configure Settings
Common Settings
Power & Speed
Power (%):
- Laser intensity for engraving
- Lower power for lighter marking
- Higher power for deeper engraving
Speed (mm/min):
- How fast the laser scans
- Faster = lighter, slower = darker
Line Interval
Line Interval (mm):
- Spacing between scan lines
- Smaller = higher quality, longer job time
- Larger = faster, visible lines
| Interval | Quality | Speed | Use For |
|---|---|---|---|
| 0.05mm | Highest | Slowest | Photos, fine detail |
| 0.1mm | High | Medium | Text, logos, graphics |
| 0.2mm | Medium | Fast | Solid fills, textures |
| 0.3mm+ | Low | Fastest | Draft, testing |
Recommended: 0.1mm for general use
For images, line interval should match or exceed image resolution. If your image is 10 pixels/mm (254 DPI), use 0.1mm line interval or smaller.
Scan Direction
Scan Angle (degrees):
- Direction of scan lines
- 0 = horizontal (left to right)
- 90 = vertical (top to bottom)
- 45 = diagonal
Why change angle?
- Wood grain: Engrave perpendicular to grain for better results
- Pattern orientation: Match design aesthetics
- Reduce banding: Different angle can hide imperfections
Bidirectional Scanning:
- Enabled: Laser engraves in both directions (left-to-right and right-to-left), doubling speed
- Disabled: Laser only engraves left-to-right, returning without firing between lines
Bidirectional scanning is faster because the laser fires on every pass. However, slight mechanical differences between directions can cause visible banding on some materials. For critical quality work, especially on photos, disable bidirectional scanning for more consistent results.
Overscan
Overscan Distance (mm):
- How far beyond the design the laser travels before turning around
- Allows laser to reach full speed before entering the design
- Prevents burn marks at line starts/ends
Typical values:
- 2-5mm for most jobs
- Larger for high speeds
See Overscan for details.
Post-Processing
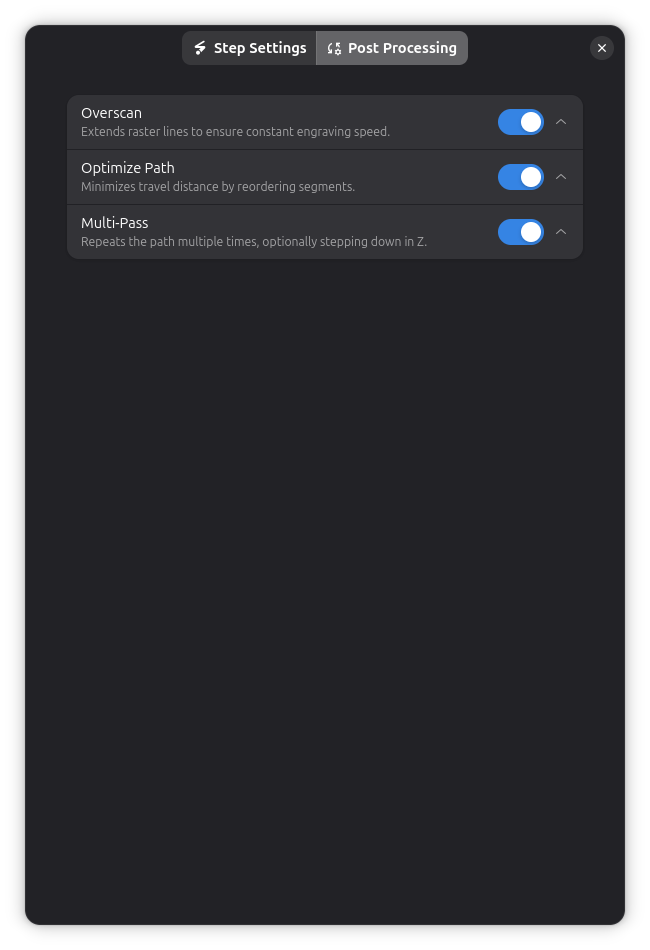
Engrave operations support several post-processing options:
- Overscan - Extend raster lines for consistent engraving quality
- Path Optimization - Reduce travel distance
- Multi-Pass - Repeat engraving for deeper results
Mode-Specific Settings
Variable Power Mode Settings
Min Power (%):
- Laser power for lightest areas (white pixels)
- Usually 0-20%
- Set higher to avoid very shallow areas
Max Power (%):
- Laser power for darkest areas (black pixels)
- Usually 40-80% depending on material
- Lower = subtle relief, higher = dramatic depth
Power Range Examples:
| Min | Max | Effect |
|---|---|---|
| 0% | 40% | Subtle, light relief |
| 10% | 60% | Medium depth, safe |
| 20% | 80% | Deep, dramatic relief |
Invert:
- Off (default): White = shallow, Black = deep
- On: White = deep, Black = shallow
Use invert for lithophanes (light areas should be thin) or embossing (raised areas).
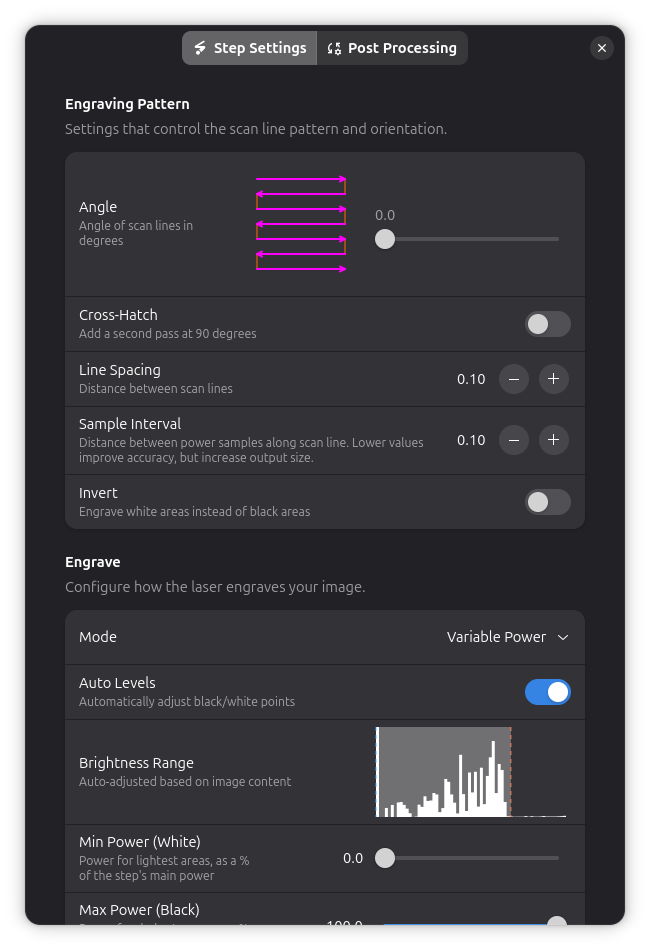
Brightness Range:
Controls how image brightness values are mapped to laser power. The histogram shows the distribution of brightness values in your image.
- Auto Levels (default): Automatically adjusts the black and white points based on image content. Values below the black point are treated as black, values above the white point are treated as white. This stretches the image's contrast to use the full power range.
- Manual Mode: Disable Auto Levels to manually set black and white points by dragging the markers on the histogram.
This is particularly useful for:
- Low-contrast images that need contrast enhancement
- Images with limited tonal range
- Ensuring consistent results across different source images
Constant Power Mode Settings
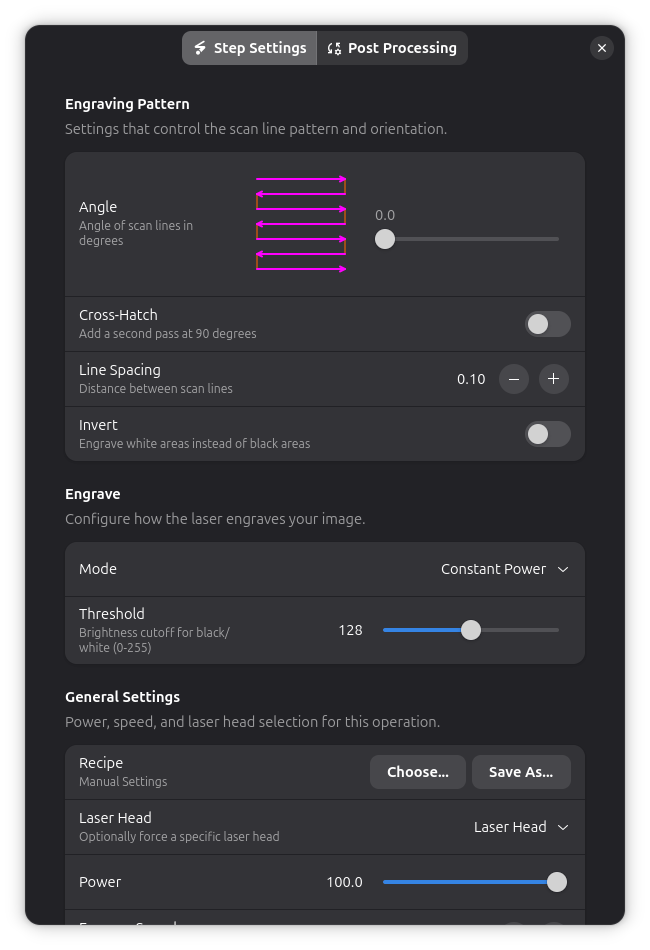
Threshold (0-255):
- Brightness cutoff for black/white separation
- Lower = more black engraved
- Higher = more white engraved
Typical values:
- 128 (50% gray threshold)
- Adjust based on image contrast
Dither Mode Settings
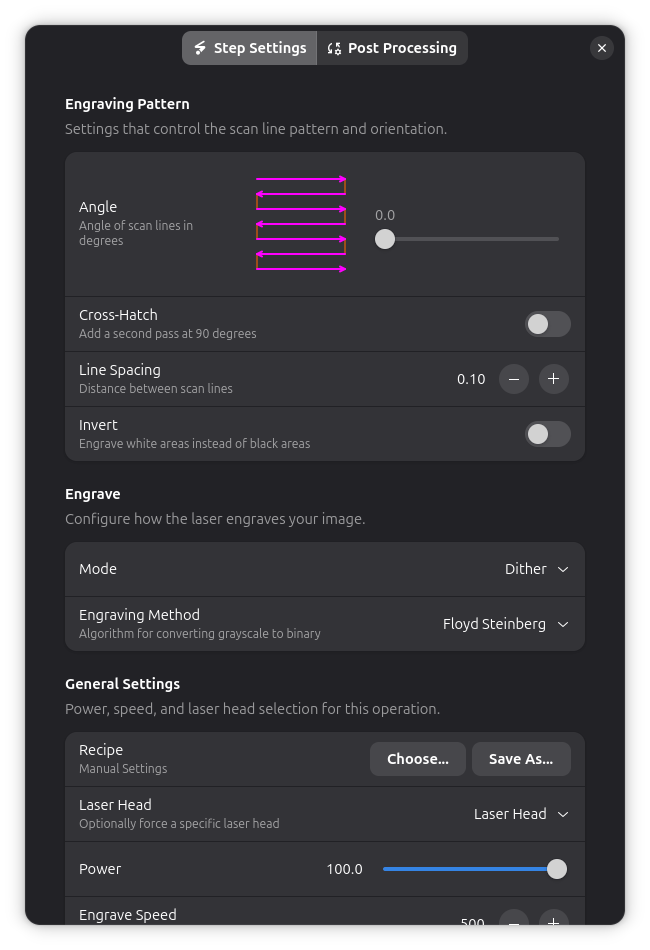
Dithering Algorithm:
Choose the algorithm that best suits your image and material:
| Algorithm | Quality | Speed | Best For |
|---|---|---|---|
| Floyd-Steinberg | Highest | Slowest | Photos, portraits, smooth gradients |
| Bayer 2x2 | Low | Fastest | Coarse halftone effect |
| Bayer 4x4 | Medium | Fast | Balanced halftone |
| Bayer 8x8 | High | Medium | Fine detail, subtle patterns |
Floyd-Steinberg is default and recommended for most photo engravings. It uses error diffusion to distribute quantization errors to neighboring pixels, creating natural-looking results.
Bayer dithering creates regular patterns that can produce artistic effects resembling traditional halftone printing.
Multiple Depths Mode Settings
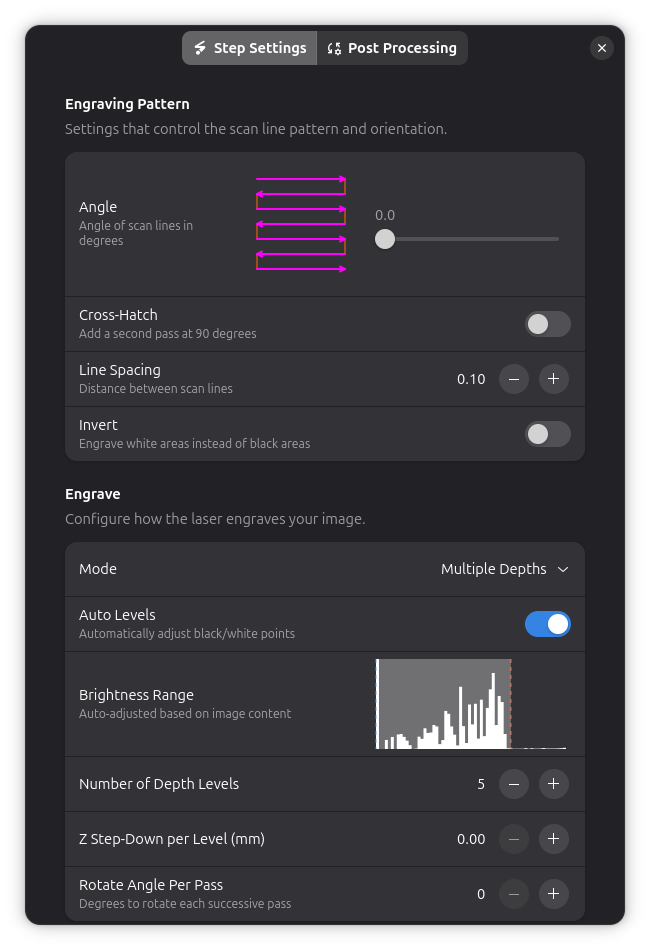
Number of Depth Levels:
- Number of discrete depth levels
- More levels = smoother gradients
- Typical: 5-10 levels
Z Step-Down per Level (mm):
- How far to step down between depth passes
- Creates deeper total depth with multiple passes
- Typical: 0.1-0.5mm
Rotate Angle Per Pass:
- Degrees to rotate each successive pass
- Creates crosshatch-like 3D effect
- Typical: 0-45 degrees
Invert:
- Enabled: White = deep, Black = shallow
- Disabled: Black = deep, White = shallow
Use invert for lithophanes (light areas should be thin) or embossing (raised areas).
Tips & Best Practices
Material Selection
Best materials for engraving:
- Wood (natural variations create beautiful results)
- Leather (burns to dark brown/black)
- Anodized aluminum (removes coating, reveals metal)
- Coated metals (removes coating layer)
- Some plastics (test first!)
Challenging materials:
- Clear acrylic (doesn't show engraving well)
- Metals without coating (requires special marking compounds)
- Glass (requires special settings/coatings)
Quality Settings
For best quality:
- Use smaller line interval (0.05-0.1mm)
- Disable bidirectional scanning
- Increase overscan (3-5mm)
- Use lower power, multiple passes
- Ensure material is flat and secured
For faster engraving:
- Use larger line interval (0.15-0.2mm)
- Enable bidirectional scanning
- Minimum overscan (1-2mm)
- Single pass at higher power
Common Issues
Burn marks at line ends:
- Increase overscan distance
- Check acceleration settings
- Reduce power slightly
Visible scan lines:
- Decrease line interval
- Reduce power (over-burning creates gaps)
- Check that material is flat
Uneven engraving:
- Ensure material is flat
- Check focus consistency
- Verify laser power stability
- Clean laser lens
Banding (dark/light stripes):
- Disable bidirectional scanning
- Check belt tension
- Reduce speed
- Try different scan angle
Troubleshooting
Engraving too light
- Increase: Power setting
- Decrease: Speed setting
- Check: Focus is correct
- Try: Multiple passes
Engraving too dark/burning
- Decrease: Power setting
- Increase: Speed setting
- Increase: Line interval
- Check: Material is appropriate
Inconsistent darkness
- Check: Material is flat
- Check: Focus distance is consistent
- Verify: Laser beam is clean
- Test: Different area of material (grain varies)
Image looks pixelated
- Decrease: Line interval
- Check: Source image resolution
- Try: Smaller line interval (0.05mm)
- Verify: Image isn't being upscaled
Scan lines visible
- Decrease: Line interval
- Reduce: Power (over-burning creates gaps)
- Try: Different scan angle
- Ensure: Material surface is smooth
Related Topics
- Contour Cutting - Cutting outlines and shapes
- Overscan - Improving engraving quality
- Material Test Grid - Finding optimal settings
- Multi-Layer Workflow - Combining engrave with other operations