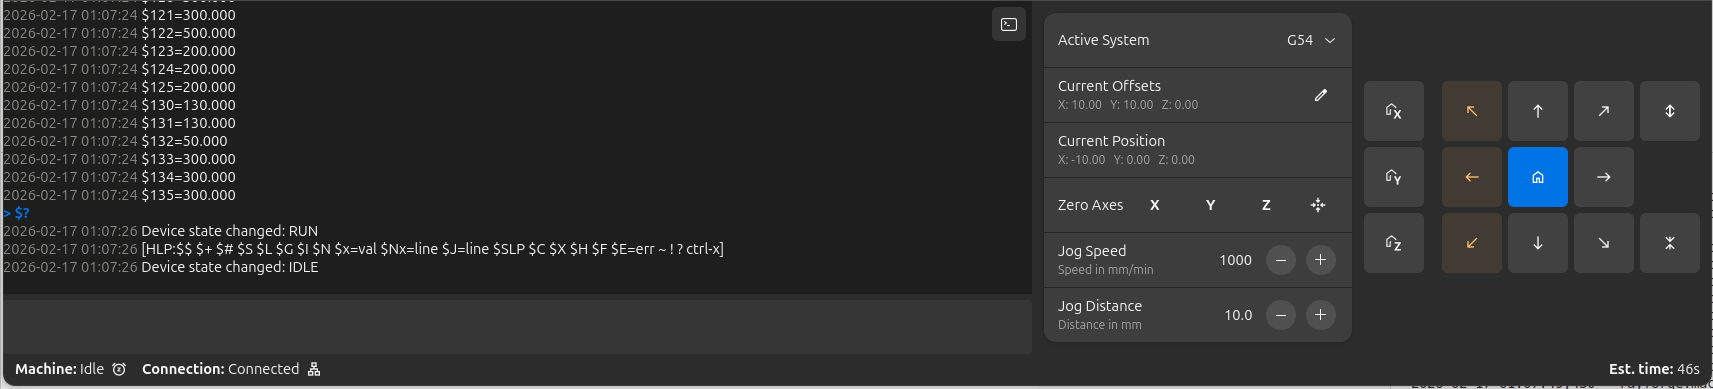
Control Panel
The Control Panel at the bottom of the Rayforge window provides manual control over your laser cutter's position, real-time machine status, and a log view for monitoring operations.
Overview
The Control Panel combines several functions into one convenient interface:
- Jog Controls: Manual movement and positioning
- Machine Status: Real-time position and connection state
- Console: Interactive G-code terminal with syntax highlighting
- Work Coordinate System (WCS): Quick WCS selection
Accessing the Control Panel
The Control Panel is always visible at the bottom of the main window. It can be toggled via:
- Menu: View → Control Panel
- Keyboard Shortcut: Ctrl+L
The jog controls are only available when connected to a machine that supports jogging operations.
Jog Controls
The jog controls provide manual control over your laser cutter's position, allowing you to precisely move the laser head for setup, alignment, and testing purposes.
Homing Controls
Home your machine's axes to establish a reference position:
| Button | Function | Description |
|---|---|---|
| Home X | Homes X axis | Moves X axis to its home position |
| Home Y | Homes Y axis | Moves Y axis to its home position |
| Home Z | Homes Z axis | Moves Z axis to its home position |
| Home All | Homes all axes | Homes all axes simultaneously |
It's recommended to home all axes before starting any job to ensure accurate positioning.
Directional Movement
The jog controls provide buttons for directional movement:
  ↖  ↑  ↗
  ←  •  →
  ↙  ↓  ↘
| Button | Movement | Keyboard Shortcut |
|---|---|---|
| ↑ | Y+ (Y- if machine is Y-flipped) | Up Arrow |
| ↓ | Y- (Y+ if machine is Y-flipped) | Down Arrow |
| ← | X- (left) | Left Arrow |
| → | X+ (right) | Right Arrow |
| ↖ (top-left) | X- Y+/- (diagonal) | - |
| ↗ (top-right) | X+ Y+/- (diagonal) | - |
| ↙ (bottom-left) | X- Y-/+ (diagonal) | - |
| ↘ (bottom-right) | X+ Y-/+ (diagonal) | - |
| Z+ | Z axis up | Page Up |
| Z- | Z axis down | Page Down |
Keyboard shortcuts only work when the main window has focus.
Visual Feedback
The jog buttons provide visual feedback:
- Normal: Button is enabled and safe to use
- Warning (orange): Movement would approach or exceed soft limits
- Disabled: Movement is not supported or machine is not connected
Jog Settings
Configure the behavior of jog operations:
Jog Speed:
- Range: 1-10,000 mm/min
- Default: 1,000 mm/min
- Purpose: Controls how fast the laser head moves
- Use lower speeds (100-500 mm/min) for precise positioning
- Use higher speeds (1,000-3,000 mm/min) for larger movements
- Very high speeds may cause missed steps on some machines
Jog Distance:
- Range: 0.1-1,000 mm
- Default: 10.0 mm
- Purpose: Controls how far the laser head moves per button press
- Use small distances (0.1-1.0 mm) for fine-tuning
- Use medium distances (5-20 mm) for general positioning
- Use large distances (50-100 mm) for quick repositioning
Machine Status Display
The Control Panel displays real-time information about your machine:
Current Position
Shows the laser head's position in the active coordinate system:
- Coordinates are relative to the selected WCS origin
- Updates in real-time as you jog or run jobs
- Format: X, Y, Z values in millimeters
Connection Status
- Connected: Green indicator, machine is responding
- Disconnected: Gray indicator, no machine connection
- Error: Red indicator, connection or communication problem
Machine State
- Idle: Machine is ready for commands
- Run: Job is currently executing
- Hold: Job is paused
- Alarm: Machine is in alarm state
- Home: Homing cycle is in progress
Work Coordinate System (WCS)
The Control Panel provides quick access to Work Coordinate System management.
Active System Selection
Select which coordinate system is currently active:
| Option | Type | Description |
|---|---|---|
| G53 (Machine) | Fixed | Absolute machine coordinates, cannot be changed |
| G54 (Work 1) | User | First work coordinate system |
| G55 (Work 2) | User | Second work coordinate system |
| G56 (Work 3) | User | Third work coordinate system |
| G57 (Work 4) | User | Fourth work coordinate system |
| G58 (Work 5) | User | Fifth work coordinate system |
| G59 (Work 6) | User | Sixth work coordinate system |
Current Offsets
Displays the offset values for the active WCS:
- Shown as (X, Y, Z) in millimeters
- Represents the distance from machine origin to WCS origin
- Updates automatically when WCS offsets change
Setting WCS Zero
Define where the origin of the active WCS should be:
| Button | Function | Description |
|---|---|---|
| Zero X | Set X=0 | Makes current X position the X origin for active WCS |
| Zero Y | Set Y=0 | Makes current Y position the Y origin for active WCS |
| Zero Z | Set Z=0 | Makes current Z position the Z origin for active WCS |
Zero buttons are disabled when G53 (Machine Coordinates) is selected, as machine coordinates are fixed by hardware.
- Connect to your machine and home all axes
- Select the WCS you want to configure (e.g., G54)
- Jog the laser head to the desired origin position
- Click Zero X and Zero Y to set this position as (0, 0)
- The offset is stored in your machine's controller
Console
The Console provides an interactive terminal-style interface for sending G-code commands and monitoring machine communication:
Command Input
The command input box allows you to send raw G-code directly to the machine:
- Multi-line Support: Paste or type multiple commands
- Enter: Sends all commands
- Shift+Enter: Inserts a newline (for editing before sending)
- History: Use Up/Down arrows to navigate previously sent commands
Log Display
The log shows communication between Rayforge and your machine with syntax highlighting for easy reading:
- User Commands (blue): Commands you entered or sent during jobs
- Timestamps (gray): Time of each message
- Errors (red): Error messages from the machine
- Warnings (orange): Warning messages
- Status Polls (dim): Real-time position/status reports like
<Idle|WPos:0.000,0.000,0.000|...>
Verbose Mode
Click the terminal icon in the top-right corner of the console to toggle verbose output:
- Off (default): Hides frequent status polls and "ok" responses
- On: Shows all machine communication
Auto-Scroll Behavior
The console automatically scrolls to show new messages:
- Scrolling up disables auto-scroll so you can review history
- Scrolling to the bottom re-enables auto-scroll
- New messages appear immediately when auto-scroll is active
Using the Console for Troubleshooting
The console is invaluable for diagnosing issues:
- Verify commands are being sent correctly
- Check for error messages from the controller
- Monitor connection status and stability
- Review job execution progress in real-time
- Send diagnostic commands (e.g.,
$$to view GRBL settings)
Machine Compatibility
The Control Panel adapts to your machine's capabilities:
Axis Support
- X/Y Axis: Supported by virtually all laser cutters
- Z Axis: Only available on machines with Z-axis control
- Diagonal Movement: Requires support for both X and Y axes
Machine Types
| Machine Type | Jog Support | Notes |
|---|---|---|
| GRBL (v1.1+) | Full | Supports all jog features |
| Smoothieware | Full | Supports all jog features |
| Custom Controllers | Variable | Depends on implementation |
Safety Features
Soft Limits
When soft limits are enabled in your machine profile:
- Buttons show orange warning when approaching limits
- Movement is automatically limited to prevent exceeding bounds
- Provides visual feedback to prevent crashes
Connection Status
- All controls are disabled when not connected to a machine
- Buttons update sensitivity based on machine state
- Prevents accidental movement during operation
Related Pages:
- Work Coordinate Systems (WCS) - Managing WCS
- Machine Setup - Configure your machine
- Keyboard Shortcuts - Complete shortcut reference
- Main Window - Main interface overview
- General Settings - Device configuration